
Well, I did say I would do a tutorial....
This is the first time I have ever written a full blown tutorial, and well, my making is a bit wonky donkey, a little bit, um, shall we say... homespun?
So, if you are to make yourself a sweet little skitchbook of your own (and I do so recommend that you do), I apologise in advance if my instructions are somewhat higgledy piggledy. If you are confuddled at any point, do drop me a wee message, and I will be sure you get back to you.
skitch·book
[skich-book]
noun
1.
Also, skitchpad. a fabric book or pad of felt sheets for stashing of needles, scissors and other notions, and for stitched sketches [skitches].
2.
a book of textile sketches.
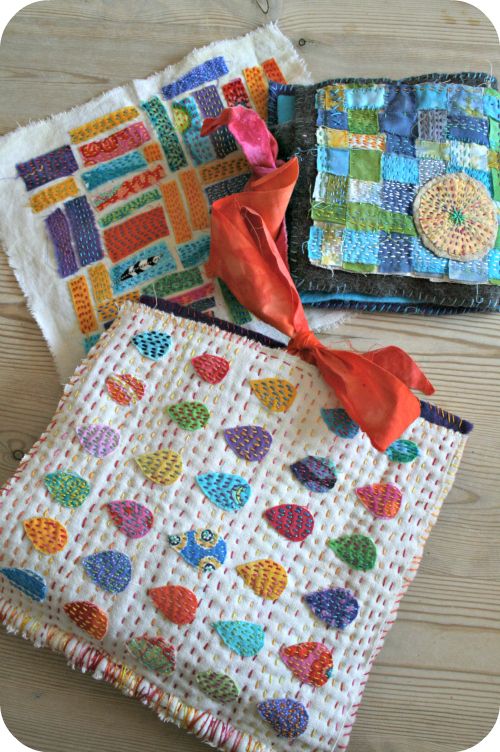
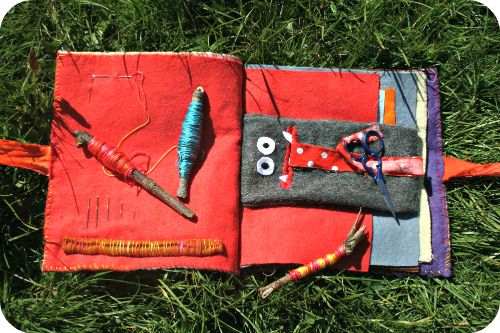
My first Skitchbook was born out of necessity, I needed a needle book to keep in my handbag, and I thought it would be a fine idea to add pages and a pocket, to store other notions and small projects which I could Sew on the Go.
The monster pocket happenned entirely by accident, it holds my scissors, which are attached to the inside of the pocket, by a long scrap of fabric, so they always stay with my skitchbook, and I always have scissors, perfect!
I am going to take you through the motions of how I made mine. It should be noted, that mine is entirely made by hand, and this makes this a slow project. As you can see, I am not inclined towards neat stitching, but if you prefer a cleaner look, you can use a sewing machine, this will likely be much quicker too!
What you will need :)
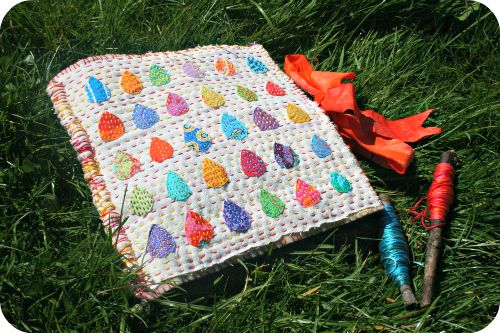
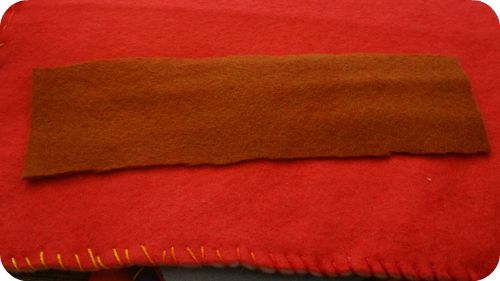
8-10 pieces of Square Felt/boiled wool fabric (mine are 5"x5" for the small skitchbook and 8"x8" for the larger)
Scraps of fabric and felt
Various embroidery threads & needles
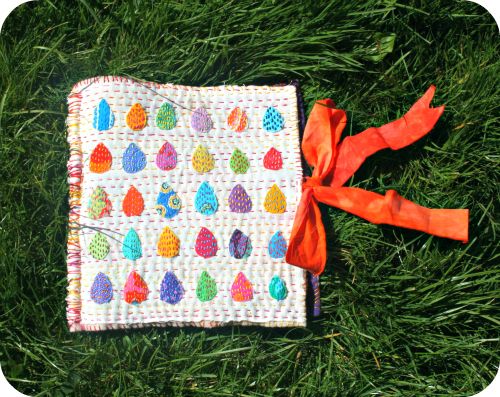
Embroidered fabric squares for front and back, the same size as your felt squares
Make the front and back covers-
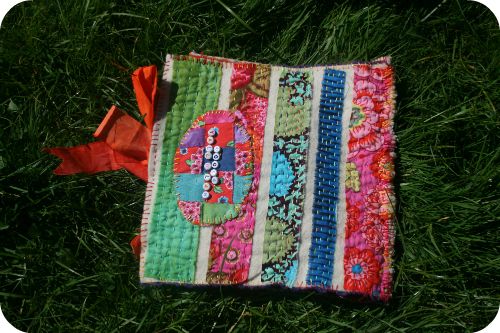
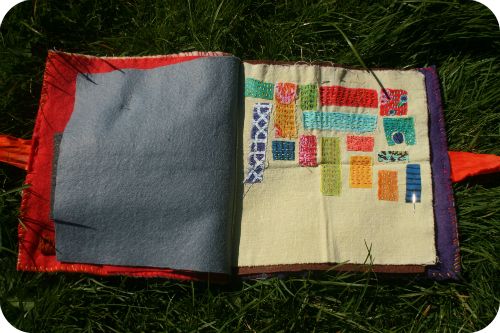
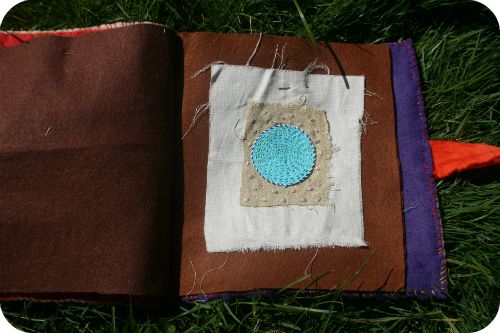
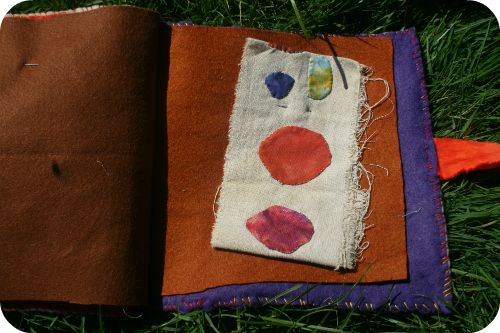
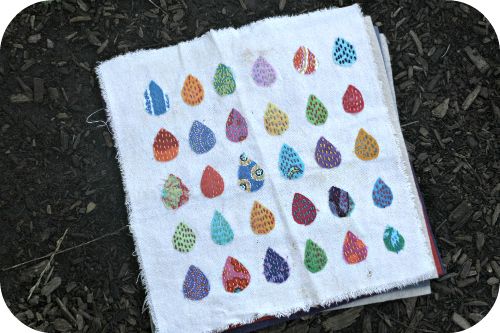
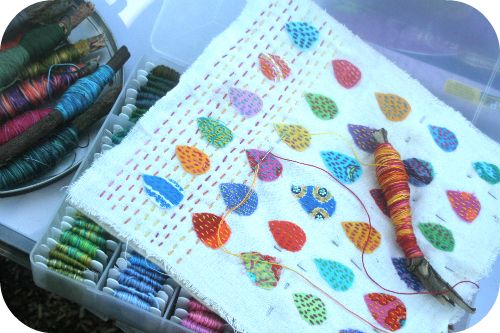
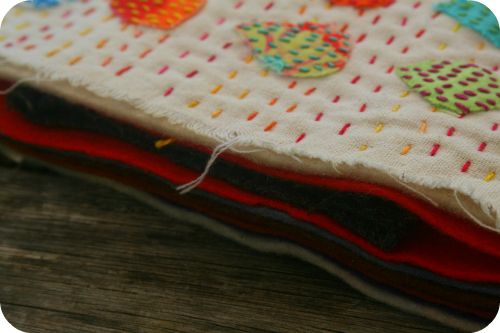
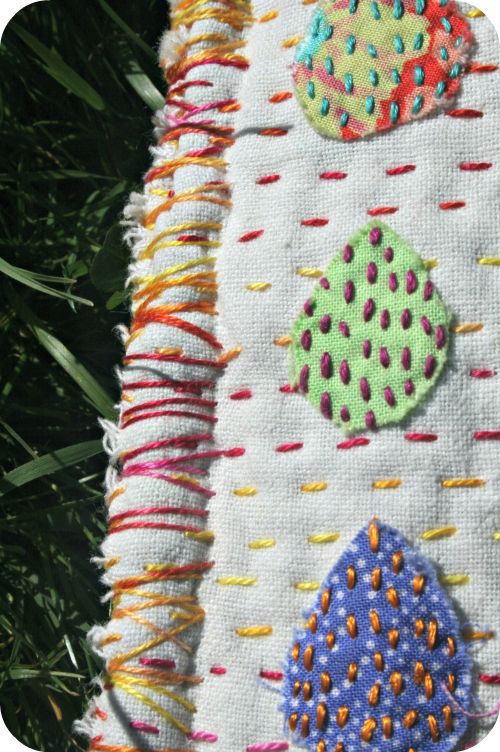
To decorate your front and back covers, you will need some embroidery on fabric or felt, this could be anything you have to hand. For the smaller skitchbook I used a couple of woven fabric samplers I made, and for the larger - the front cover is a piece of old hand dyed linen, which I kantha stitched teardrop shaped scraps to. I didn't have a suitable piece for the reverse, so I stitched lengths of scrap fabric to the actual felt square. What you choose to use for the cover decoration is entirely up to you.
Once you have chosen your decorative piece, you need to baste them to the two pieces of felt you have allocated for the front and back cover, and quilt them all over, this is to give them structure, so they don't go all floppity flop on you, more book like, if you will :)
When both your front and back are quilted to the felt pieces, you must now cover the reverse of each piece with another square of felt, pin in place, leaving a gap at the right centre middle, this is where you will insert your ties.
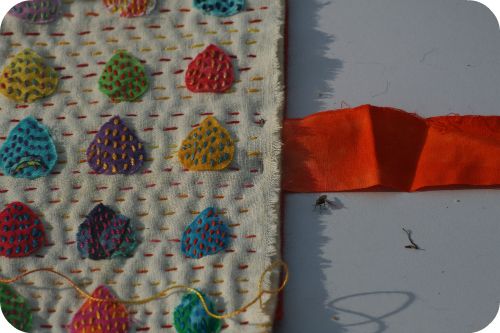
Take two long lengths of scrap fabric or ribbon, 1" or so wide, and insert them between the layer of each cover, centred on the right side, pin in place.
Now whip stitch all the way around the edge of each cover until you reach the tie, then back stitch the tie in place.
Set your covers aside.
To make the pocket -
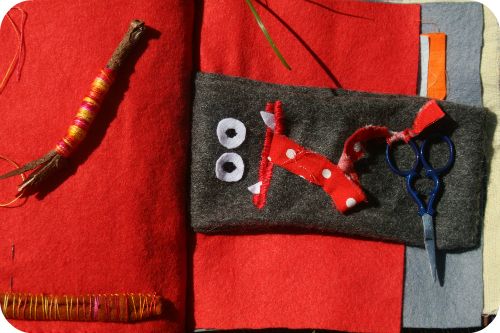
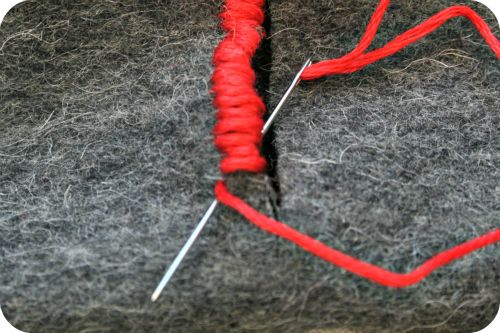
The monster pocket is one long piece of scrap felt, folded in half, leaving 3 sides open. Stitch up both long sides, to form a pocket. The open width will be tucked into the binding of your skitchbook, so you must now cut a slash in your pocket about 2/3 away down, to form an opening (the monsters mouth).
Now whipstitch tightly all the way around the edge of your pockets mouth, preferably in a splendid lip colour.

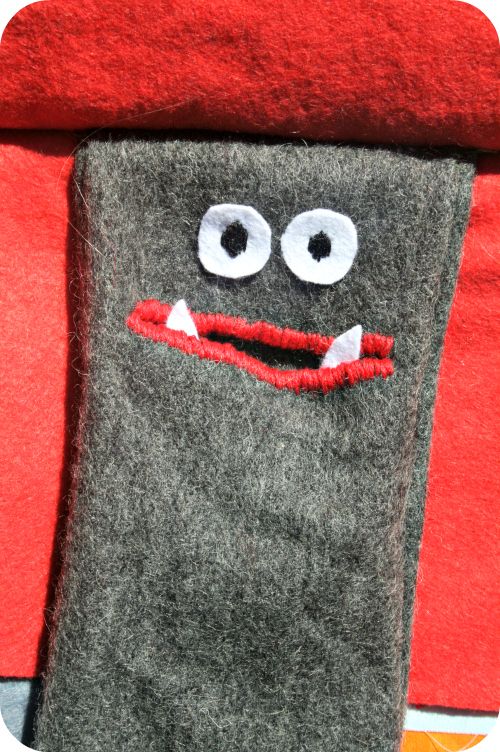
Cut eyes from scrap felt and stitch them above the mouth, they can be any shape you like. Feel free to add any quirky details, like a moustache or teeth.
Putting it all together -
Now layer everything up in the order that you want it, don't worry if the inner squares don't line up perfectly, you can trim them later if you need to, but you must make sure the left edges are lined up well, including your pocket, as this is the side you are going to bind to form the spine of your skitchbook.
Baste the left edge in place, and then whipstitch it firmly up and down the length of the spine until it is firm, and all the layers are tightly in place.
Now your skitchbook is assembled and almost complete, you just need to add the needle stop and scissors.
The needle stop is pretty self explanatory, it stops your needles from sliding out of your book. Cut a strip of scrap felt, and roll it up, then stitch it down on the inner cover of your skitchbook.
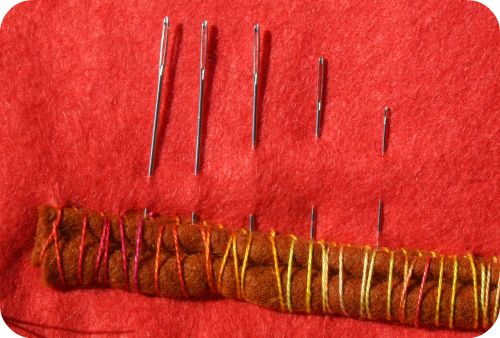
To attach the scissors, get another long strip of fabric, being mindful of how far you will need your scissors to stretch from the book. Attach one of the of the fabric scrap to the inside seam of your monster pocket, and tie the other end to your scissors, pull them out of the pocket opening and note how the fabric strip looks like a great lolloping monster tongue, and ta-daaaa! You have your very own Skitchbook!
Would you be so kind as to make sure you do not sell or use my skitchbook pattern and design for commercial purposes? Thank you sweetly!
If all of that sounds like too much hard work, then leave a wee comment on this post, and you can win the one I made above :)
If you follow, tweet, pin, facebook or blog about my tutorial and giveaway, you can have a second entry.
I will announce a winner on Sunday the 16th of September, hurrah!
Please note, the needles will not be included.
If you do make one, I would love to see!
Hey Tallulah.... put my name down for the draw...I would LOVE one of your skitchbooks. Such bright and cheery colours, and fantastic for carting around those little stitching projects. And as you already know, I love that little monster pocket!
ReplyDeleteGreat tutorial too. Thanks so much for sharing with all of us.
Jacky xox
I love your skitchbook!
ReplyDeleteI would love to win yours but if I don't I shall be following your tutorial!
I'm a happy follower!
ReplyDeleteI love this! Would love to win it...or maybe I should just get off my lazy bottom and make one ;-)
ReplyDeleteI follow xx
ReplyDeleteDear Hoolah Tallulah
ReplyDeleteI am sorry that it has been a while since my last visit but today I find wonderous things - the book reminds me of a Stig Lindberg design from the 50s. Splendido in all ways - I particularly like the miss mosh range of colours and constrasting theadidos that marry it all together so well. What a lovely and creative thing to make (I had only seen fabric 'quiet' books for children and was going to make one of those but this is more creative and wonderous.
Lovely dearie and many thanks for sharing that loveliness with us
Best wishes
Jenny
PS Just realised that I seem to have disappeared as a follower - oh the mysteries of blogger!!!!I am back on again I think!
ReplyDeletePick me, pick me!!! I'll send you a cow in return!!! :-D)) I love love LOVE your skitchbook but I simply don't have time to make one with these littluns hanging off me all day..... my projects are always stuffed anywhere and I can never find anything I need... great tutorial, thanks for posting it - if you don't (sob) pick me I will def make one ONE day!!! xx
ReplyDeleteI blogged about your skitchbook xx
ReplyDeletehttp://www.blogger.com/blogger.g?blogID=3096817983352197158#editor/target=post;postID=5483372150592996269
Oops, that URL was a load of rubbish, sorry! http://underagibbousmoon.blogspot.co.uk/ instead x
ReplyDeleteoh beautiful sketchy skitchiness! Just found you through Chloe at under a gibbous moon blog. I'll pin ya and give ya a mention over at my Dotty blog. A very generous and lovely giveaway indeedio.
ReplyDeleteDotty x
ooooh this is so cute and fun! I will try to make one myself with your expert instructions / tutorial - but yours is so cute and pretty, perhaps I may win :) thank you for this post! and for including me in the opportunity to win :D
ReplyDeleteoh, my! not sure what to love most about this...the monster face, the tear drops, or the charming stitching (not to mention the practicality). would love to have something with "hoola talllulah" on it.
ReplyDeleteOoh...put me down for the draw too! (you are very generous). Thanks for the great tutorial - I will definitely give it a try!
ReplyDeleteDot xx
P.S I have sewn the beautiful Leo cloth you made for me onto a cushion so I can admire it every day on my couch x
Oh my gosh this is gorgeous!! Such a great idea :)
ReplyDeleteI'm a new follower too! Love your blog, your daughter's room looks amazing and I have also had so many walks with my kids taking way too long finding the perfect stone!! Look forward to following along with your adventures :)
ReplyDeleteI love this...and the way you write. Higgledy piggledy confuddled are wonderfully descriptive words and wonky donkey, wow! I would love to sit and have a talk with you. Thank you for the tutorial. Your giveaway is so generous...I am crossing my fingers and hoping. Mo'a
ReplyDeletewow!!! just discovered you, so exciting,soo exuberant- your my kind of gal,a nutty stitcher!arnt we a great tribe, following you now on, about to read all your old posts, hurrah for free stitching and unruly edges......tina
ReplyDeleteI like your instructional style and adore the skich book itself - MUCH nicer than what I generally carry around (ummm, that would be a gallon-sized Ziploc bag!!!)
ReplyDeleteI believe one term of art for these books is 'etui' which I know NOT because I work with threads and needles, but because I do Sunday crossword puzzles!
I don't know where my comment went? doesn't say held - isn't showing up....
ReplyDeletejust mentiond you on my blog, stand by for visitors, love that book. tina
ReplyDeleteOh I love that! I love the stitching and the color and the fabric happiness of it all!
ReplyDeleteI love your stitching it's very like kantha work. I'm sure it's full of love in the stitching.
ReplyDeleteI am sweetypies friend you know the neat one, but that does not mean I can't appreciate others beautiful hand stitching
And I would love to see it in My Sewing Room
Frankie
ha! what a delightful little monster tucked into a beautiful skitchbook. i love, love, love this!
ReplyDeletei've also added you to my blogroll, because, somehow, mysteriously, you have never appeared there before, though i have been an ardent admirer for a long time!
namaste'
I love your work. Please enter me into the competition. I came over from Chloe Grice's blog :)
ReplyDeleteOh my goodness...this is amazing...please please enter my name...I am in love with all this lovely colour. Thank you soooo much for a chance to win. xoxo
ReplyDeletehi i am a big fan of your work i ave you as one of my contacts on flickr i woulod love to be in with a chance to win a skitchbook of yours
ReplyDeletetazzie kitten
this is fantastic!!!
ReplyDeleteI am so going to make one of these... ;)
Lotus
This is fantastic! I love the surprise of the monster pocket!
ReplyDeleteI am soooo gonna make one of these... ;)
Lotus
Whoever won your skitchbook was one very lucky winner! Oh! What a beautifully embellished cloth book. I adore all of your pretty stitches...it is so cool! Yummy colors and thread and fabrics!
ReplyDeleteAnd thank you for the tutorial on how to make one myself!
Teresa in California
http://amagicalwhimsy.blogspot/
First time to your blog and it's great!
I am posting another comment as I am now a follower of your blog and I am going to put your blog link on the side bar of my blog so I can readily come here and also let others know about your creativity!
ReplyDeleteTeresa in California
http://amagicalwhimsy.blogspot.com/
I'm back again letting you know I have highlighted your blog on my latest post!
ReplyDeleteCheers!
Teresa in California
http://amagicalwhimsy.blogspot.com/
It's such a lovely homespun monster.
ReplyDeleteTo me it's just perfect!
I missed your giveaway, so I suppose I am going to have to make one for myself. Unless you just want to give away another one, to me...grin. I just love your embroidery, and have only just found you, through flickr. Thank you so much for sharing your art with us!!
ReplyDelete